Embark on a journey through the realm of exterior siding installation, where every corner holds secrets of durability, maintenance, and aesthetic appeal. From choosing the right materials to mastering installation techniques, this guide will equip you with the knowledge needed to transform your home's exterior with confidence.
Types of Exterior Siding
When it comes to choosing the right exterior siding for your home, there are several options available. Each type of siding material has its own set of pros and cons, as well as varying levels of durability and maintenance requirements.
Vinyl Siding
- Pros: Affordable, low maintenance, comes in a variety of colors and styles.
- Cons: Can crack or fade over time, not as eco-friendly as other options.
Fiber Cement Siding
- Pros: Durable, fire-resistant, low maintenance, can mimic the look of wood or stucco.
- Cons: More expensive than vinyl, heavier to install, requires painting over time.
Wood Siding
- Pros: Natural look, environmentally friendly, can be painted or stained in various colors.
- Cons: Prone to rot, insects, and warping if not properly maintained, higher maintenance requirements.
Brick Siding
- Pros: Timeless look, durable, low maintenance, excellent insulation properties.
- Cons: Expensive upfront cost, difficult to install or repair, limited design options.
Stone Veneer Siding
- Pros: Aesthetic appeal, lightweight, easy to install, comes in various textures and colors.
- Cons: Higher cost compared to other materials, may require periodic cleaning and sealing.
Preparation for Installation
To ensure a successful exterior siding installation, proper preparation of the exterior wall is essential. Preparing the surface beforehand helps in achieving a smooth and long-lasting finish while also ensuring the structural integrity of the siding.
Importance of Preparing the Surface
- Clean the exterior wall by removing any dirt, debris, or old paint. This allows the siding to adhere properly and prevents any imperfections from showing through.
- Repair any damaged areas on the wall, such as cracks or holes, to create a level surface for the siding installation. This step is crucial to prevent moisture from seeping in and causing further damage.
- Apply a weather-resistant barrier or primer to the exterior wall to protect it from moisture and other elements. This barrier helps in increasing the longevity of the siding and the overall structure.
Steps for Preparing the Surface
- Inspect the exterior wall for any damage or imperfections.
- Clean the surface thoroughly using a pressure washer or a scrub brush with a mixture of water and detergent.
- Repair any cracks or holes with a suitable filler or patching compound.
- Apply a weather-resistant barrier or primer to the entire surface, following the manufacturer's instructions.
- Allow the surface to dry completely before proceeding with the siding installation.
Tools and Materials Needed
Here are the essential tools and materials required for preparing the exterior wall for siding installation:
| Tools: | Materials: |
| - Pressure washer or scrub brush | - Filler or patching compound |
| - Paint scraper or wire brush | - Weather-resistant barrier or primer |
| - Caulking gun | - Water and detergent |
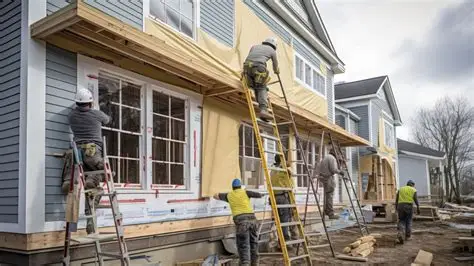
Installation Techniques
When it comes to installing exterior siding, following the correct techniques is crucial to ensure a seamless and long-lasting finish. Proper alignment, cutting, and fitting are key aspects of the installation process that should not be overlooked. Below, we detail the step-by-step process of installing exterior siding, provide tips for ensuring proper alignment, and discuss best practices for cutting and fitting siding pieces.
Step-by-Step Installation Process
- Start by preparing the surface where the siding will be installed, ensuring it is clean, smooth, and free of any debris.
- Begin installing the starter strip at the bottom of the wall, making sure it is level and properly aligned.
- Continue by installing the first full siding panel, ensuring it is level and securely attached to the wall.
- Overlap each subsequent siding panel according to the manufacturer's instructions, nailing them in place as you go.
- Trim the siding panels as needed to fit around windows, doors, corners, and other obstacles on the wall.
- Finish the installation by adding trim pieces and ensuring all siding panels are securely attached and aligned.
Tips for Proper Alignment
- Use a level to ensure each siding panel is installed straight and level, avoiding any crooked or uneven placements.
- Check the alignment of each panel as you go along, making adjustments as needed to maintain a uniform and seamless appearance.
- Pay close attention to corners and edges, ensuring they are properly aligned and meet seamlessly for a professional finish.
Best Practices for Cutting and Fitting
- Measure twice and cut once to ensure accuracy when trimming siding panels to fit around obstacles.
- Use a sharp utility knife, tin snips, or a circular saw with a fine-tooth blade for clean and precise cuts.
- Take your time when cutting and fitting siding pieces, ensuring they fit snugly and securely without gaps or overlaps.
Finishing and Maintenance
When it comes to finishing and maintaining your exterior siding after installation, there are several important steps to follow to ensure its longevity and visual appeal. Proper finishing and regular maintenance can help protect your siding from the elements and keep it looking great for years to come.
Painting Options
- For wood siding, painting is a common finishing option that can provide both protection and aesthetic appeal. Choose a high-quality exterior paint that is specifically designed for use on wood surfaces.
- Before painting, make sure the siding is clean, dry, and free of any debris. Apply a primer if necessary to create a smooth surface for the paint to adhere to.
- Consider using a semi-gloss or satin finish for wood siding, as these finishes are more durable and easier to clean than flat finishes.
Sealing Options
- For vinyl or fiber cement siding, sealing is often recommended to protect the material from moisture and UV damage. Look for a high-quality exterior sealant that is compatible with the type of siding you have.
- Apply the sealant according to the manufacturer's instructions, making sure to cover all seams and edges to create a watertight barrier.
- Regularly inspect the sealed areas for any signs of wear or damage, and reapply the sealant as needed to maintain its effectiveness.
Staining Options
- Some homeowners prefer the natural look of stained wood siding. Staining can enhance the beauty of the wood grain while still providing protection against the elements.
- Choose a high-quality exterior wood stain that is designed to withstand the outdoor environment. Apply the stain evenly and according to the manufacturer's instructions for best results.
- Regularly inspect the stained siding for any signs of fading or wear, and reapply the stain as needed to keep it looking fresh and vibrant.
Regular Maintenance
- Regardless of the type of siding you have, regular maintenance is key to prolonging its lifespan. This includes cleaning the siding periodically to remove dirt, debris, and mildew that can accumulate over time.
- Inspect the siding for any signs of damage, such as cracks, warping, or discoloration, and address any issues promptly to prevent further damage.
- Trim any vegetation that is in contact with the siding to prevent moisture buildup and potential damage. Keep gutters clean and free of debris to ensure proper drainage away from the siding.
Epilogue
As we conclude our exploration of exterior siding installation, remember that the key to a long-lasting, visually appealing exterior lies in proper preparation, meticulous installation, and consistent maintenance. By following the tips and guidelines Artikeld in this guide, you can elevate the curb appeal and value of your home for years to come.
FAQ Guide
What are the most common types of exterior siding materials?
Common types include vinyl, wood, fiber cement, metal, and brick.
How important is it to prepare the exterior wall before installing siding?
Proper preparation ensures a smooth and lasting installation, preventing issues down the line.
What are some best practices for cutting and fitting siding pieces?
Measure twice, cut once. Use a sharp blade and ensure accurate measurements for a precise fit.


